Quick Start Guide
Use this guide to set up Jataka with GitHub, Salesforce, CI secrets, and Jira in a production-ready way.
 Connect your GitHub account from the Jataka dashboard.
Authorize repository access for the organization you want to onboard.
Connect your GitHub account from the Jataka dashboard.
Authorize repository access for the organization you want to onboard. Select the GitHub repository where your Salesforce metadata and workflows are maintained.
Confirm that the selected repository is the same one used for your release process.
Select the GitHub repository where your Salesforce metadata and workflows are maintained.
Confirm that the selected repository is the same one used for your release process. Select the target branch that should run Jataka checks.
If your workspace uses Brain profiles, choose the appropriate Brain for this repository.
Select the target branch that should run Jataka checks.
If your workspace uses Brain profiles, choose the appropriate Brain for this repository. Connect Salesforce and choose the correct environment: production (
login.salesforce.com) or sandbox (test.salesforce.com).
Verify that the connected org matches the environment used by your deployment pipeline.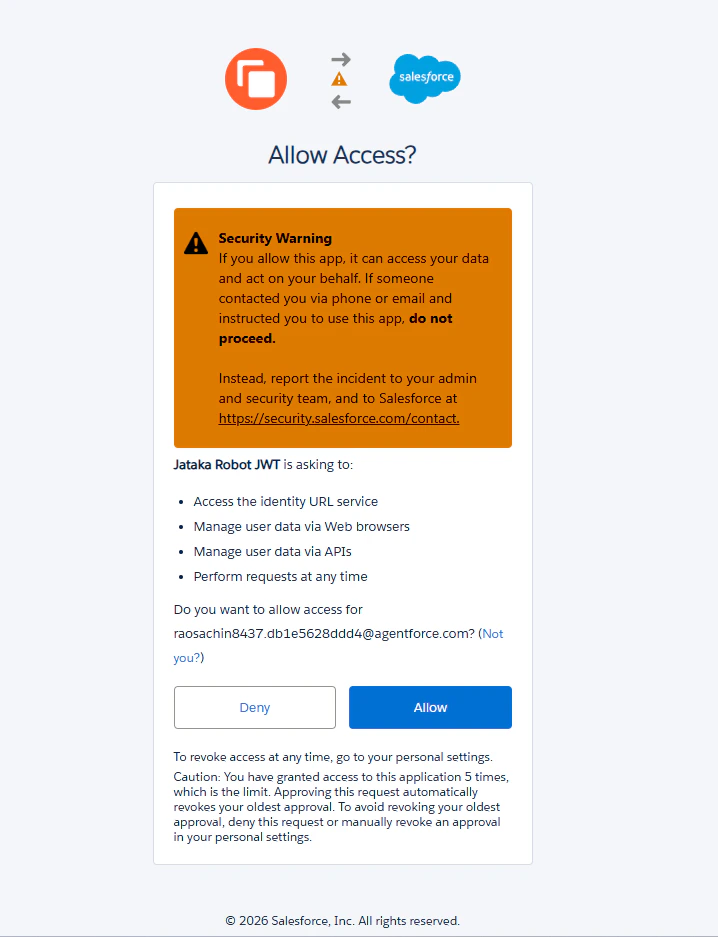 Allow all the permissions
 Authenticate your target Salesforce org in the CLI first:
sf org login web --alias staging-org
sf org display --target-org staging-org --verbose
 Optional: Add the generated auth URL as a GitHub Actions secret as
 SFDX_AUTH_URL.
Add this to your workflow file to make sure changes are deployed the testing environment before running tests:- name: Authenticate to Salesforce
run: |
echo "${{ secrets.SFDX_AUTH_URL }}" > auth_url.txt
sf org login sfdx-url --sfdx-url-file auth_url.txt --set-default --alias staging-org
rm auth_url.txt
 Generate the Jataka API key from the integration setup panel (Step 3 flow).
Save it in GitHub Secrets as
Generate the Jataka API key from the integration setup panel (Step 3 flow).
Save it in GitHub Secrets as JATAKA_API_KEY the same way as other credentials. Add this step to your project workflow file (for example,
 .github/workflows/deploy.yml) after Salesforce deployment:- name: Trigger Jataka AI UI Tests
# Put this step AFTER your Salesforce deployment step (Gearset, Copado, or SFDX)
run: |
curl -X POST "${{ secrets.JATAKA_API_URL }}/api/integrations/github/trigger" \
-H "Authorization: Bearer ${{ secrets.JATAKA_API_KEY }}" \
-H "Content-Type: application/json" \
-d '{
"installation_id": "YOUR_INSTALLATION_ID",
"repo_full_name": "${{ github.repository }}",
"branch": "${{ github.head_ref || github.ref_name }}",
"pr_number": ${{ github.event.pull_request.number || 'null' }},
"test_mode": "${{ vars.JATAKA_TEST_MODE || 'auto' }}",
"action": "${{ github.event.action }}",
"before_sha": "${{ github.event.before }}"
}'
JATAKA_TEST_MODE and set it based on your need under the actions -> variable. Connect your Jira account so Jataka can read ticket context tied to branches, commits, or pull requests.
Ensure the Jira site selected is the one used by your engineering teams.
Connect your Jira account so Jataka can read ticket context tied to branches, commits, or pull requests.
Ensure the Jira site selected is the one used by your engineering teams.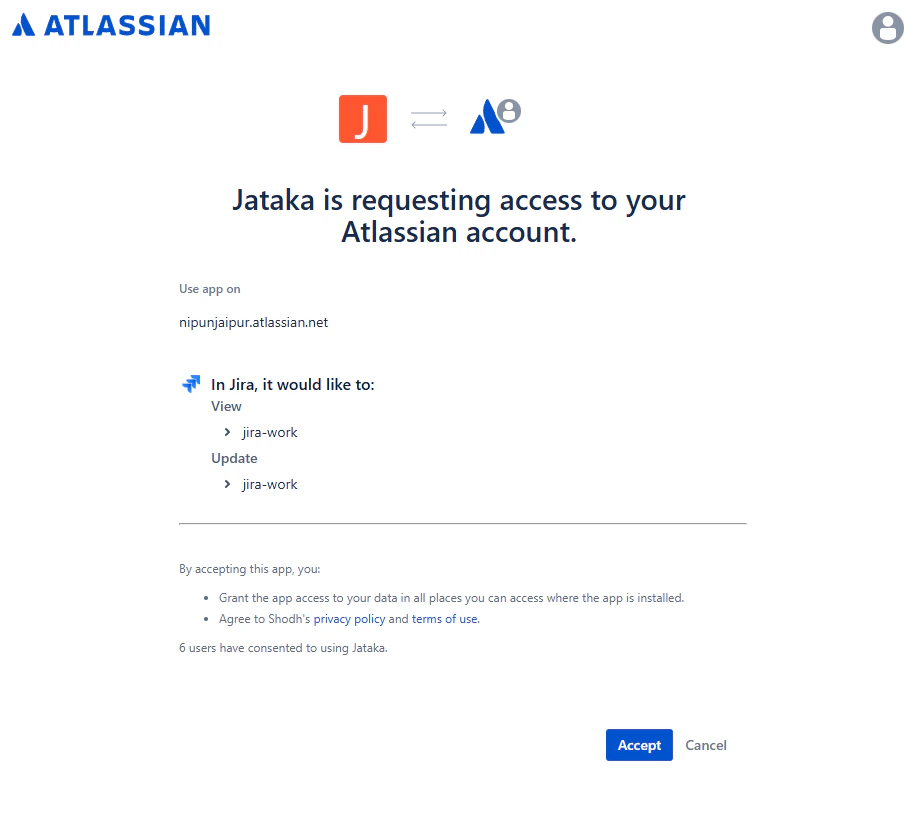 Allow all the permissions and click Accept.
 Set the exact Jira project key that should be used for ticket lookup.
Validate the key format and test one linked ticket before enabling for all pipelines.
Set the exact Jira project key that should be used for ticket lookup.
Validate the key format and test one linked ticket before enabling for all pipelines. Include the Jira ticket number in the pull request title so Jataka can derive ticket context for test execution.
Example format:
Include the Jira ticket number in the pull request title so Jataka can derive ticket context for test execution.
Example format: PROJ-123: Improve lead conversion validation.Setup complete: your repository, Salesforce org, secrets, workflow checks, and Jira context are now aligned for automated Jataka validation.
MCP Server Setup (VS Code)
To use governed, context-aware coding directly in your IDE, install and authenticate the Jataka VS Code extension using your dashboard auth token.
Read the full setup and tool guide here: MCP Server for VS Code